
How Can We Help?
Installing Windows 7 Extended Security Updates (ESU) Keys
Installing and Activating
Windows 7 Extended Security Updates (ESU) Key
This article is intended to assist in installing and activating your purchased Windows 7 Extended Security Updates (ESU) key on your Windows 7 PC.
Installation Prerequisites
The following steps must be completed on the PC before installing and activating ESU keys:
- Install the SHA-2 code signing support update and servicing stack update (SSU) or a later SSU:
Windows 7 SP1
Servicing stack update for Windows 7 SP1
SHA-2 code signing support update for Windows 7
- Install the following SSU and monthly rollup:
Windows 7 SP1:
Servicing stack update for Windows 7 SP1: September 10, 2019 (KB4516655)
October 8, 2019: Monthly Rollup (KB4519976)
Installation and Activation
Once you have addressed the prerequisites, you’re ready to install and activate Extended Security Updates. Machines must be connected to the internet in order to install and activate.
First, install the ESU product key using the Windows Software Licensing Management Tool (slmgr):
Note: Installing the ESU product key will not replace the current OS activation method being used on the device. This is achieved by using the Activation ID to differentiate between the operating system’s activation and the ESU activation.
- Open an elevated Command Prompt (right click and Run as Administrator) from the start menu.
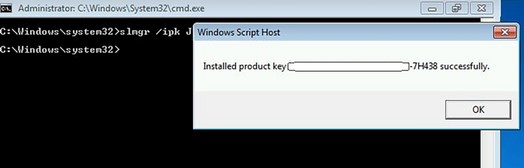
- Type slmgr /ipk <Your ESU key> (without the < and > and press Enter.
- If the product key installed successfully, you will see a message similar to the following:
Next, find the ESU Activation ID:
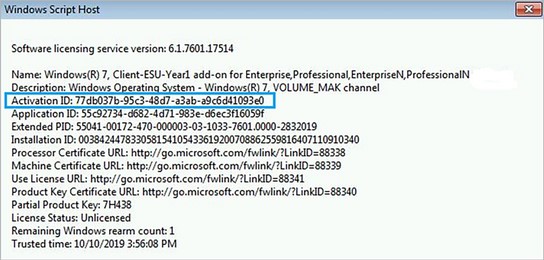
- In the same elevated Command Prompt, type slmgr /dlv and press Enter.
- Note the Activation ID as you will need it in the next step.
Now, you’ll activate the ESU product key:
- On an elevated Command Prompt (right click and Run as Administrator) from the start menu.
- Type slmgr /ato <ESU Activation Id> (without the < and > ) and press Enter.
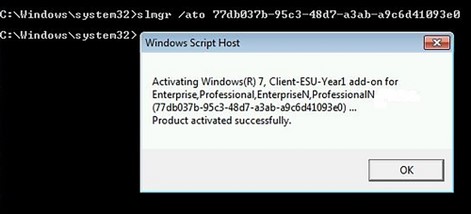
3. If you get the above “Product Activated Successfully” message, you have successfully installed and activated the Windows 7 Extended Security Updates for this PC.
Verifying Your Install
Once you have activated the Windows 7 Extended Security Updates (ESU) product key, you can verify the status at any time by following these steps:
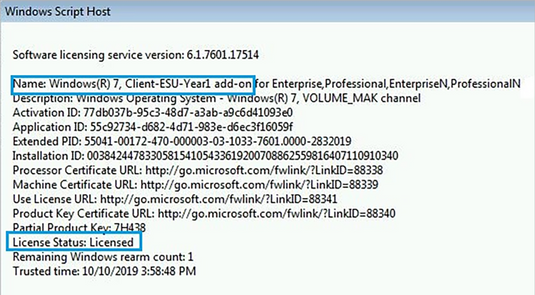
- Open an elevated Command Prompt.
- Type slmgr /dlv and select Enter.
- Licensed Status shows Licensed information for the corresponding ESU program, as shown below:
NOTES: If you have an enterprise deployment we recommend using a management tool, such as System Center Configuration Manager, to send the slmgr commands as scripts to your devices.