
How Can We Help?
Map a SharePoint Document Library as a Network Drive
Disclaimer: This is not an ideal method of using SharePoint online. Using SharePoint may be a big change, and even shocking to some people who have been using a network file share for a long time, I would advised that you should really use SharePoint through its intended mediums so you can get the most out of all of its features. Using SharePoint as a “Mapped drive File Share” has many limitations and a less than stellar user experience. Some of these unsupported items / limitations are:
- Document versioning is not supported.
- More than 5000 items in any given folder is not supported.
- Limited SharePoint Search.
- Deep folder hierarchy is not supported due to URL length limits.
- Metadata is not supported.
As nostalgic as having a “S Drive” in your windows explorer may be, if you are someone who was using a computer since before 2015 and you are now using Windows 10, you can use SharePoint without mapping it as a Drive. It might be a little more slow going at first, but I promise, you will gain multiple times more productivity than you had with your trusty ole “S drive” when you start to use SharePoint as SharePoint and not a “File Share.”
Introduction
If you are still reading, you probably have that one user who just wants to collaborate like the last 20 years. Or maybe you are that user. If so, here you go!
****IMPORTANT**** One of the most important things to note is that in order to use a mapped drive, any steps that require a browser MUST be done in Internet Explorer. Explorer view and mapped SharePoint drives ARE not supported in ANY other browser.
************** SECURITY WARNING ************
DO NOT, for any reason, under any circumstances, map a network drive on a public PC, or a PC that you are sharing with someone who wouldn’t otherwise have access to your SharePoint documents. You are caching your login credentials and leaving the browser logged in.
Prepare the PC
Before you can actually map the drive, there are some setting that you need to change on your PC to be able to map a drive to SharePoint online.
IE Trusted Sites
First, we need to make sure that the SharePoint Online and a few other Microsoft URL’s have been added to your Trusted sites zone in Internet Explorer and that the Trusted Sites zone is set to the lowest level. To do this, follow these steps:
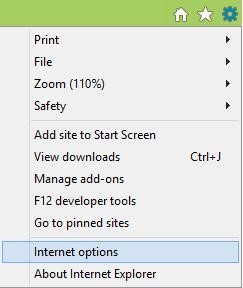
- Open Internet Explorer.
- Click the settings gear icon, and then click Internet options.
- On the Internet Options dialog box
- Click the General tab (if it didn’t open to it for some reason)
- Make sure that the “Delete browsing history on exit” check box is UNCHECKED. (click Apply) if you made a change
- Click the Settings box in the Browsing History section
- In the dialog box that pops up click the History tab
- Make sure that the “Days to keep pages in history” is set to at least 20 and then click OK to return to the Internet Settings.
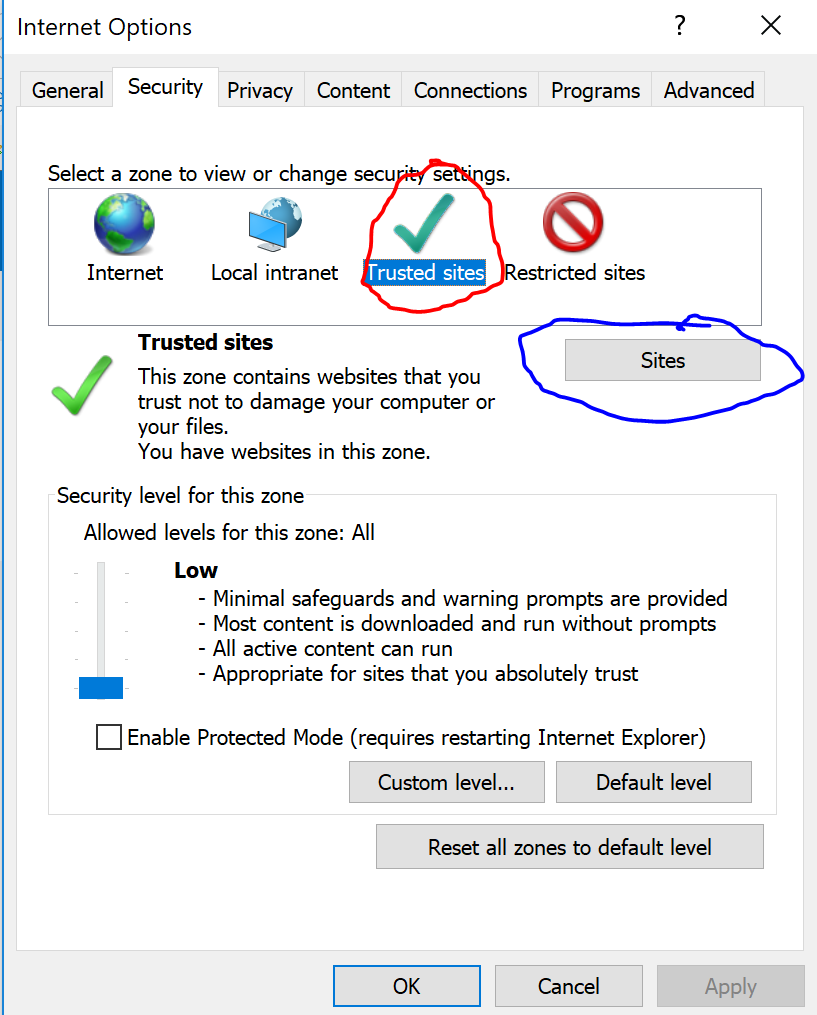
- Click the Security tab
- Click the Trusted sites icon, and then click the Sites option.
- Uncheck the box “require server verification for (https: ) for all sites in this zone.
- In the “Add this website to the zone” box, type *.sharepoint.com

- Click the Add button.
- Now do the same above step for each of the following items, replacing *.sharepoint.com with the item in the list.
*.live.com
*.microsoft.com
*.microsoftonline.com
*.office.com
*.office365.com
*.sharepoint.com
*.windows.net
- After you have added each site to the Websites list, click Close.
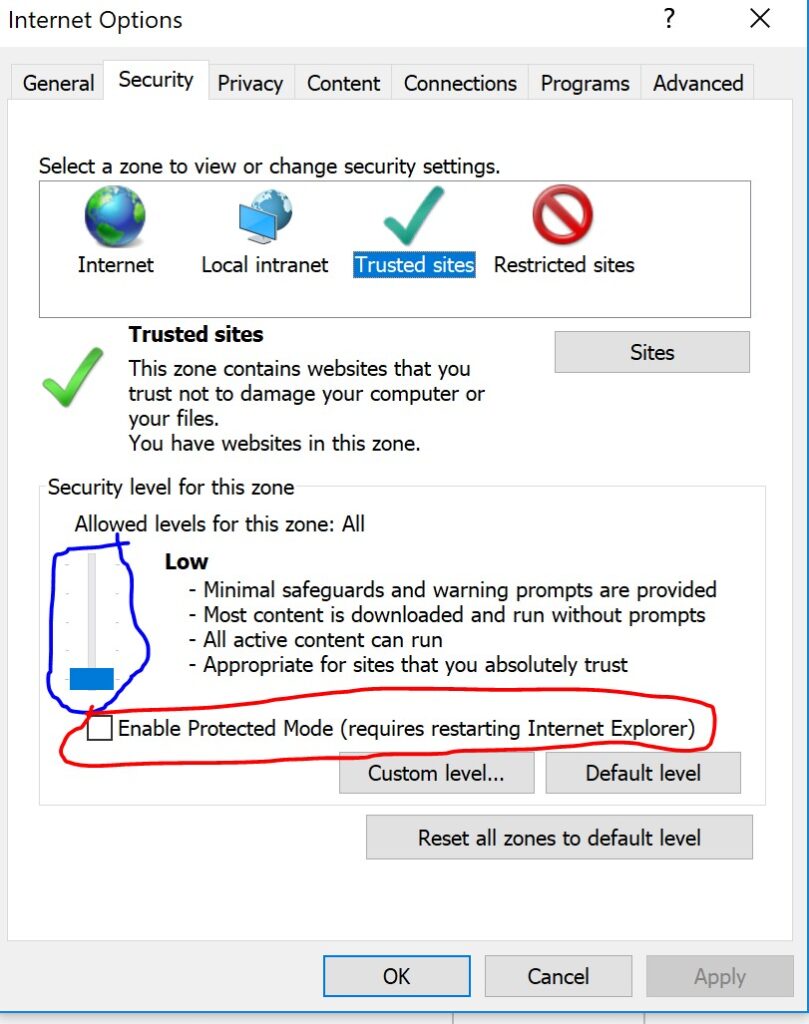
- Back on the main page, make sure the slider for “Security Level for this zone”, is set to LOW, and the checkbox for “Enable Protected Mode” is unchecked
- Click Apply
- Click the “Connections” tab
- Click the Settings Option
- If you see the “Use automatic configuration script” or “Use a proxy server…” check-boxes checked, STOP and talk with someone who is familiar with your network setup, making any settings changes with these configured will likely break something and render you unable to browse the internet.
- Make sure that the “Automatically detect settings” box is UNCHECKED and then click OK.
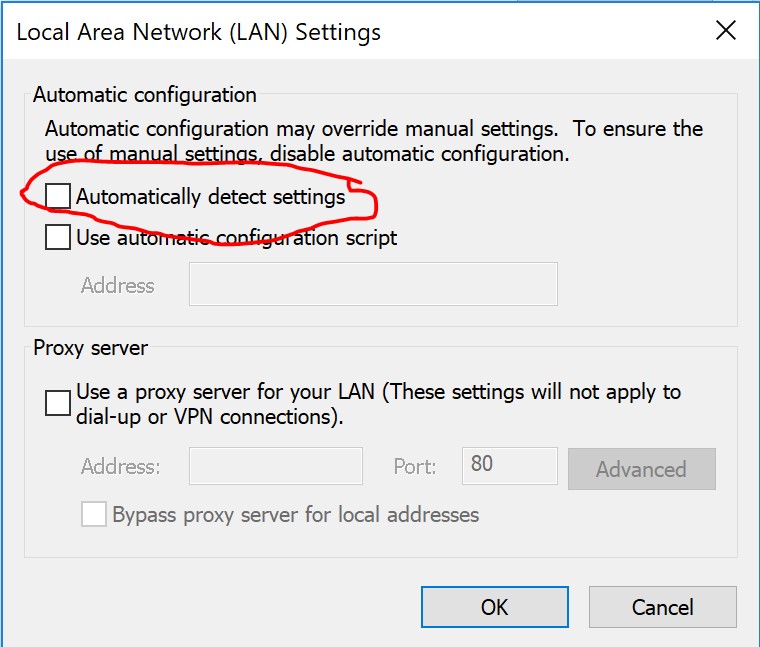
- Click OK again to exit the internet settings page
- Close out of all Internet Explorer windows
Configure the WebClient Service
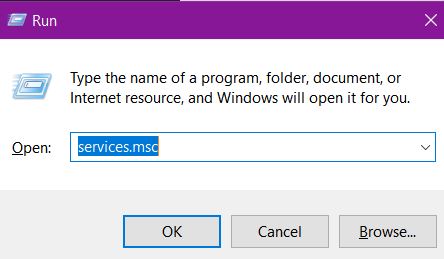
- Press the Windows Key + R on your keyboard (Win+R) to bring up the RUN dialog box.
- If there is anything in the RUN dialog go ahead and delete it, then type in services.msc and click OK.
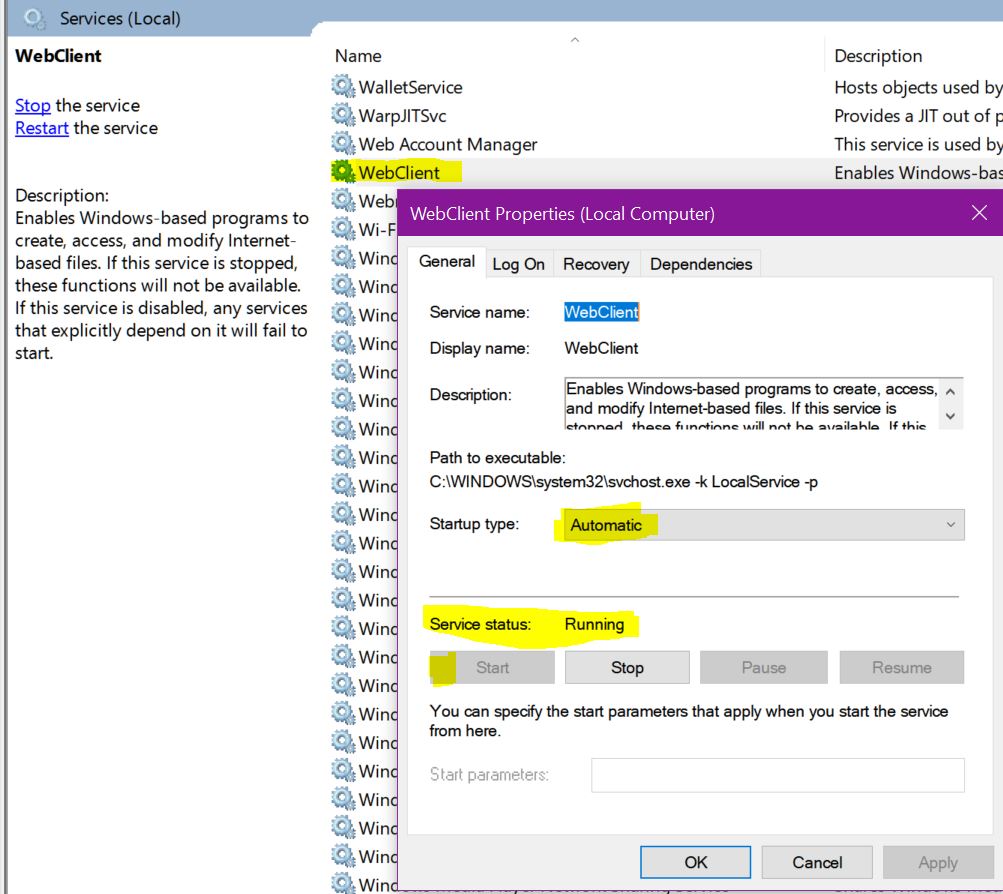
- In the list of services, locate the service named WebClient
- Double click on the name WebClient to open the settings box
- Make sure the dropdown next to “Startup Type” says “Automatic”
- Click Apply if you made a change.
- Make sure the the Service Status says “Running” If it does not, click the start button a wait a moment until it says running
- Click OK to close the settings dialog box and you can also close out the services window.
Drive Mapping
Congratulations, you have made it this far. Time to ACTUALLY map the network drive to SharePoint online!!!!!!!!
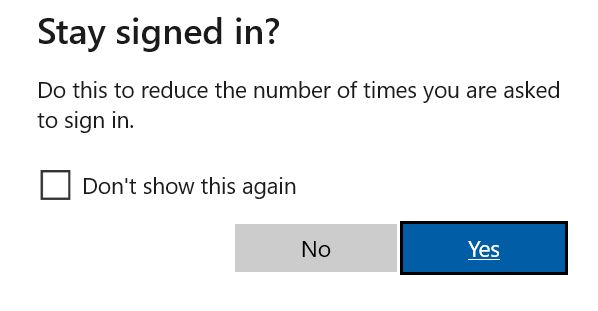
- Using Internet Explorer, login to your SharePoint site. Do not go on auto-pilot here and just start clicking, there is an important small step during the login process we must take.
- While logging in, you will be presented with the following screen asking if you would like to Stay Signed in.. Click YES on this screen. It is advised NOT to click the “Don’t show this again” option.
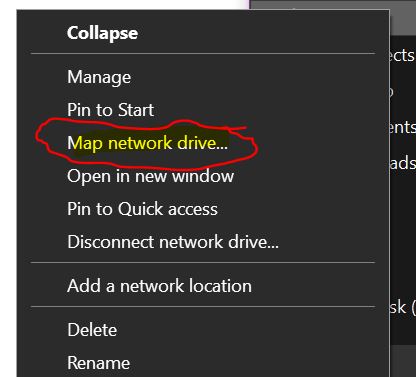
- In windows file explorer, find the icon that says “This PC” and right click on it and choose the “Map Network Drive” option.
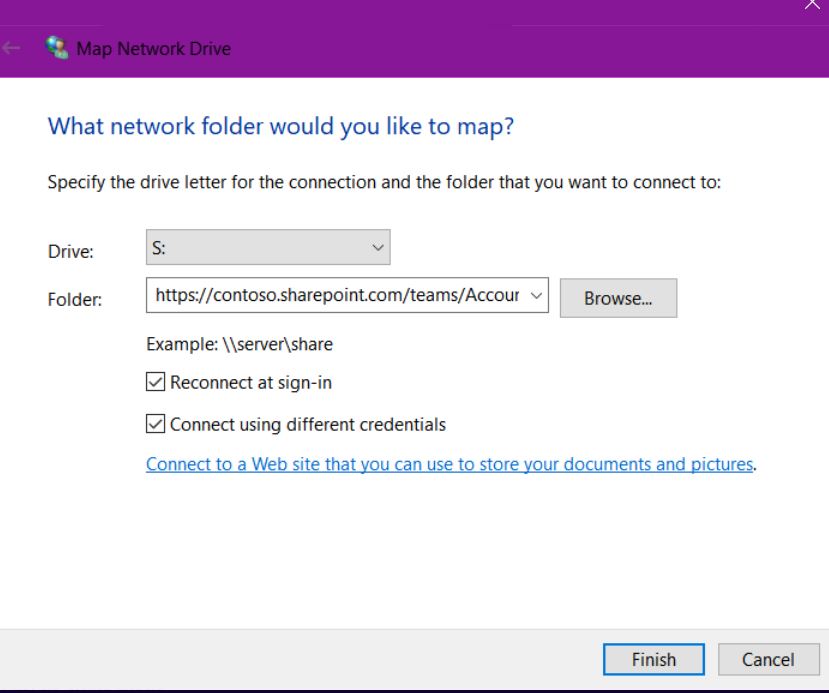
- In the drop-down for “Drive”, choose what drive letter you would like to use for this drive.
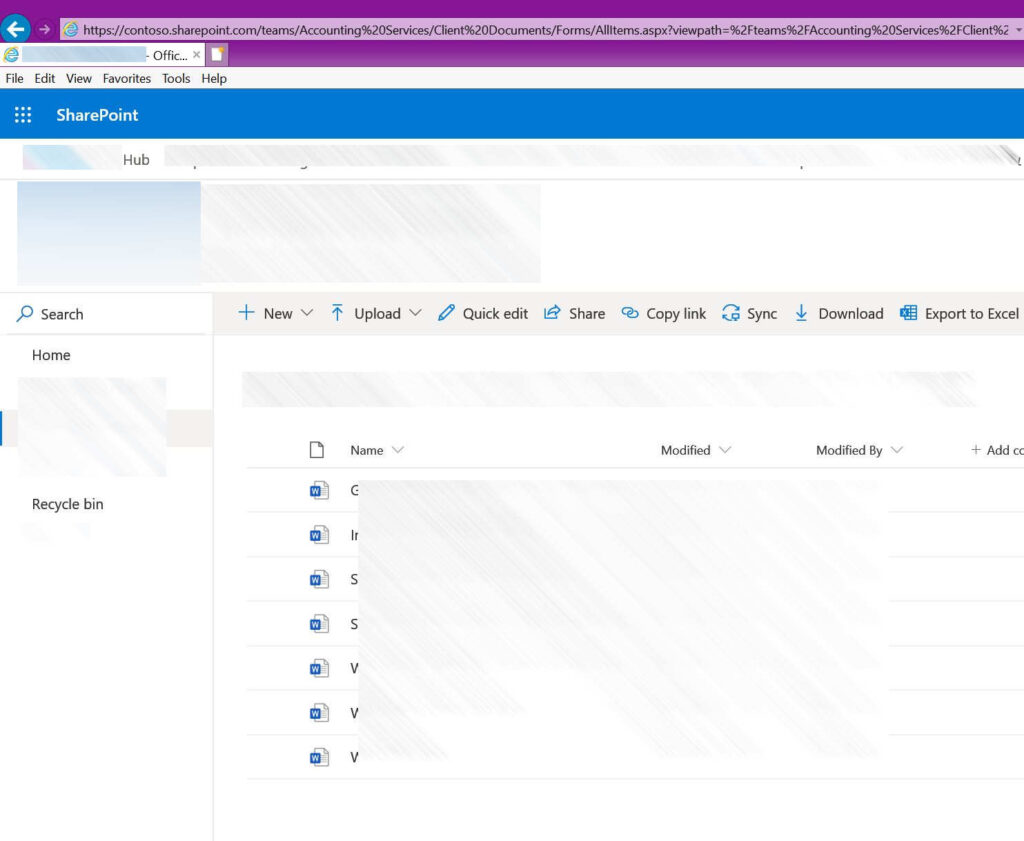
- In the “Folder” box, you will want to input the SharePoint address to the document library that you want to map.
- You can get this from your Internet Explorer address bar. It is the entire address before the first “/Forms/Allitems.aspx” part EXACTLY as it is displayed .
- In the below example I have navigated with Internet Explorer to the “Accounting” document library inside of the Accounting Team SharePoint site.
- If I wanted to map a drive to this folder, I would type “https://contoso.sharepoint.com/teams/Accounting%20Services/Client%20Documents” into the folder box. Well I would copy (Ctrl+C) and paste (Ctrl+V) it, but you can practice your typing skills if you would like to.
- If you would like to map a drive to the Root of the SharePoint structure so you can see all your document libraries when you open the mapped drive, instead of mapping them individually, you would enter in “\\contoso.sharepoint.com@SSL\DavWWWRoot” instead of the above URL to the document library. Replace contoso with your .SharePoint.com site.
- Make sure that BOTH the “Reconnect at sign-in” and “Connect using different credentials” options are checked and click Finish.
- When prompted to enter in your username and password, enter in your username and password that you use to login to the Office 365 portal, and check the box to remember your credentials before clicking OK.
- Cross your fingers and if all goes well you should now have your mapped drive in your Windows File Explorer. If not, go through the first steps again.
Keep Mapped after Logoff / Reboot
You didn’t think you were going to get away that easy, did you? Anytime you log off your PC and then log back on (not lock and unlock), or reboot your PC you need to make sure that you open up Internet Explorer, navigate to your SharePoint site, and make sure that you are logged in so that your system re-authenticates your PC to SharePoint BEFORE you try clicking on the mapped drive or using it in any way. After you are logged into SharePoint you can close out Internet Explorer and start using the drive. If you don’t do this, your drive won’t work. Yes, even if you open Internet Explorer and you are already signed in, you still MUST navigate to this site so that the authentication token that is stored on your PC is updated.
YES, I’m for real. NO I’m not kidding.
Now before you panic TOO much, there is an easy way to do this so you don’t have to think about it too much by making it so Internet Explorer automatically starts and goes to your SharePoint address. To do this:
- Press the Windows Key + R on your keyboard (Win+R) to bring up the RUN dialog box.
- If there is anything in the RUN dialog go ahead and delete it, then type in shell:startup and click OK.
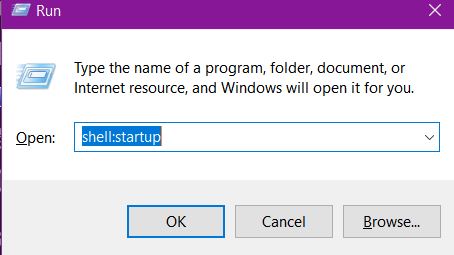
- This will bring up a new file explorer window that is your users startup folder (shortcuts that will run when you login).
- Right click in an empty space in the folder and go to NEW>Shortcut.
- In the location of the item box, enter in the following based on if you have a 32 bit or 64 bit version of Windows 10 INCLUDING the quote marks (“) you see. If you aren’t sure, you probably have the 64 bit version. I suggest you copy and paste the below code and just change the “contoso” part of the URL to yours. It is all on a single line with only a single space after the last “ and before the https://
64 Bit
"C:\Program Files (x86)\Internet Explorer\iexplore.exe" https://contoso.sharepoint.com32 Bit
"C:\Program Files\Internet Explorer\iexplore.exe" https://contoso.sharepoint.com- Click Next and give the shortcut a name, it doesn’t matter what, but I usually put SharePoint.
- Click Finish.
Now when you first login to your PC, Internet Explorer will launch and navigate to your SharePoint site. All you need to do is make sure that you don’t need to sign in to see your SharePoint site in the browser and then you can close Internet Explorer and use your Firef…. errr I mean Microsoft Edge browser for everything else in your day.
Troubleshooting / Password Changes
Yes, the drive map WILL break at some point, and you will change your password to login to Office 365 (hopefully). Here are some steps to follow…
Changed Password
When you change your password, you will need to update your mapped drive to reflect this. To do this:
- Locate your mapped drive in the Windows File Explorer
- Right click and choose the disconnect option
- Reboot your PC
- Follow the steps outlined under “Drive Mapping” above to re-map your drive with your new password.
IT’S BROKEN!!!!!!!
You clicked on the mapped drive so you could get to a file and WHAM!!!!! Error message. Some common ones are:
- \\Path is not accessible. You might not have permission to use this network resource. Contact the administrator of this server to find out if you have access permissions.
- Access Denied. Before opening files in this location, you must first add the web site to your trusted site list, browse to the web site, and select the option to login automatically’
Mapped drives will generally break anytime there is an important deadline you are trying to meet, right before an important meeting that you need to get a document for, or on a Friday at 4:45pm when you are trying to get out of the office. If this happens there are a few steps to take. This may not always work and you may need to call in an expert like us at LogicCloud IT; but 60% of the time it works every time…
Troubleshooting Stage 1
- Reboot your PC. NO, shutting down and then powering back on IS NOT the same thing as rebooting in Windows 10 land unless you have made some specific settings changes to modify the defaults. Click the start menu, click the power icon and choose REBOOT.
- After the reboot, before you touch anything, open Internet Explorer (if you don’t have it set to automatically open) and make sure you can navigate around inside your SharePoint online site without any errors.
- Open the Windows File Explorer and try accessing your Mapped Drive. If it has a red X on it that is totally meaningless when it comes to SharePoint mapped drives. The only way to know if it is actually working is to try to open the drive. Red X or not.
Troubleshooting Stage 2
If stage 1 didn’t fix the issue, all hope isn’t lost… yet…
- Open Internet Explorer and navigate to your SharePoint site.
- In the top right hand corner click on the icon with your initials (or photo if you put one) and choose the option to sign out.
- Close Internet Explorer.
- Go back above to the “Prepare the PC” section of this document and make sure that all the settings are correct.
- REBOOT your PC.
- Open internet explorer (if it didn’t open automatically) and log in, making sure you say YES to the keeping you signed in option.
An occasional Microsoft windows update or even a third party plugin may have changed a setting. You may have also sneezed to closely to your PC… Windows doesn’t like that. Bad operator, you have made the hamster running the PC mad.
Troubleshooting Stage 3
If the above two troubleshooting stages didn’t work, we have reached DEFCON 3 and your boss is probably breathing down your neck. Try the following:
- Locate your mapped drive in the Windows File Explorer
- Right click and choose the disconnect option
- Reboot your PC
- Follow the steps outlined under “Drive Mapping” above to re-map your drive.
Troubleshooting Stage 4
Still not working??? Okay, Houston, we’ve had a problem here”
We’ve reached DEFCON 4
Time to call in the experts. Contact Us and we can assist you in figuring out what is wrong.